Discovering the glass around iPhone camera cracked can be nerve-wracking. But there’s no need to panic. This article will guide you through every step of diagnosing and fixing the issue, using straightforward language and simple instructions.
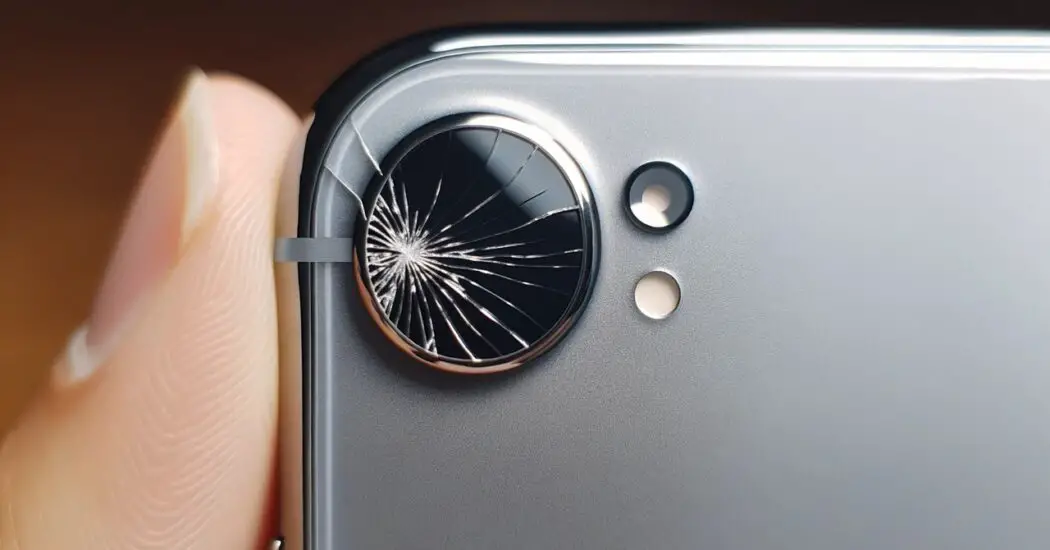
Table of Contents
Glass Around iPhone Camera Cracked: Identifying the Issue
The first thing you need to do is confirm whether the glass around your iPhone camera is actually cracked. Optical illusions can play tricks on you—what looks like a crack might just be dirt or a smudge. First, gently wipe down the area around the camera using a microfiber cloth.
These cloths are usually effective at removing dirt without scratching the glass. Make sure to do this gently so as not to make the crack worse if it’s really there. Next, inspect the glass under a well-lit environment or use a flashlight for a better view. Look at the glass from different angles to ensure that what you’re seeing is a crack and not a smudge or scratch.
Glass Around iPhone Camera Cracked
If the glass around your iPhone camera is cracked, you will need to replace it. Follow the steps below to do this…
Backup Your Data
Before you venture into the realm of iPhone repair, it’s crucial to back up your data. If something goes wrong during the repair, this backup could be a lifesaver. To back up your iPhone to iCloud, open the ‘Settings’ app and tap on your name at the top. Then, navigate to ‘iCloud’, scroll down, and tap on ‘Backup’.
Here you’ll find the option to “Back Up Now”. Make sure you’re connected to Wi-Fi and have sufficient iCloud storage before tapping this. Alternatively, you can connect your iPhone to your computer and use iTunes for the backup. Choose the ‘Back Up Now’ option after selecting your device.
Tools Needed
To repair a cracked glass around your iPhone camera, you’ll need some specific tools. First, get a Phillips screwdriver, which is used for most internal screws inside the iPhone. Second, you’ll need a pentalobe screwdriver, which is specialized for opening iPhones and is used to remove the external screws near the charging port.
A set of tweezers will be needed to handle small or delicate internal components. Finally, make sure to purchase a new camera glass replacement kit that is compatible with your specific iPhone model. This kit usually includes the replacement glass and sometimes adhesive for sticking it to the camera area.
Power Off Your iPhone
Safety first. Before starting the repair, you should power off your iPhone to minimize the risk of electrical complications. To do so, press and hold the side button along with either of the volume buttons. A slider will appear on the screen saying “slide to power off.” Swipe this slider, and your phone will power down. Wait a few seconds to make sure it’s completely off.
Read more iPhone camera topics here – iPhone Camera: How To, Problems & Solutions
Remove Screws
The screws near the charging port are your gateway into the iPhone’s internals, so they have to be removed first. Use the pentalobe screwdriver for this task. These screws are extremely small and easy to lose, so as you remove them, place them in a small container or lay them out on a piece of paper with labels. This makes it easier to keep track of screws and aids in the reassembly process.
Open the iPhone
After you’ve powered off your iPhone and removed the screws, you’ll need to open it up to get to the camera glass. To do this, use a plastic opening tool specifically designed for mobile phone repairs. Starting at the bottom of the phone near the charging port, insert the flat end of the opening tool between the metal frame and the front screen.
Gently pry it open just enough to create a small gap. Now, slide the opening tool along the sides, carefully prying the frame from the screen as you go. Take your time during this process and be gentle to avoid damaging any internal components or cables connected to the screen.
Remove Old Glass
Once the iPhone is open, you’ll need to find the camera assembly. It should be fairly easy to locate near the top of the phone’s internal layout. At this point, put on a pair of safety goggles to protect your eyes from any potential glass shards.
Using a set of tweezers, cautiously start removing the broken or shattered pieces of glass around the camera lens. Try to lift the shards out at an angle at which they won’t scratch the camera lens. Dispose of these glass pieces safely to prevent any injury.
Install New Glass
After removing the broken glass, it’s time to install the new one. Take your replacement camera glass (which should be part of the replacement kit you’ve purchased) and carefully align it over the camera lens. Make sure it aligns perfectly with the camera hole and doesn’t cover the lens in any way.
Once it’s in position, use the tweezers to gently press down along the edges, securing it in place. Many replacement kits come with adhesive pre-applied, but if yours doesn’t, you may need to use a suitable adhesive to fix the glass firmly.
Reassemble Your iPhone
With the new glass installed, you’re almost at the finish line. Now it’s time to reassemble your iPhone. Carefully align the screen back onto the frame, starting from the top and working your way down to the bottom. Once everything appears to be aligned correctly, gently press down around the edges to snap the front screen back into the metal frame.
Finally, replace the screws near the charging port using the pentalobe screwdriver. Tighten them sufficiently but take care not to overtighten, as this can cause damage. After this, power on your iPhone to make sure that everything is working as expected—particularly the camera, to ensure the new glass is properly installed.
Final Thoughts: Glass Around iPhone Camera Cracked
Fixing a cracked glass around an iPhone camera can be stressful, but with the right guidance, you can resolve this issue efficiently. Always remember to backup your data and power off your iPhone before initiating any repairs.